The Magic of a Hidden Passage Starts with Simplicity
A secret passage has a way of turning an ordinary home into something unforgettable. It suggests mystery, privacy, creativity, and a little bit of theatrical charm. Most people imagine hidden doors as something found only in castles, old mansions, movie sets, or expensive custom homes, but the truth is much more approachable. A secret passage can be created with basic materials, a thoughtful layout, and a small set of tools that many homeowners already own. The key is not to build the most complicated mechanism possible. The key is to create the illusion of normality. A good secret passage does not announce itself. It blends into the room, hides its seams, uses familiar surfaces, and makes people look right past it. When you focus on camouflage instead of complexity, the project becomes far more realistic for beginners.
A: Yes, especially if you disguise an existing doorway or closet instead of building a new opening.
A: A flush panel, mirror door, curtain-hidden entry, or disguised existing door is usually easiest.
A: Not for most beginner projects; using an existing opening is safer, faster, and more affordable.
A: A tape measure, pencil, level, drill, screwdriver, stud finder, saw, sandpaper, and paint tools are often enough.
A: Matching wall paint, wallpaper, vertical slats, trim, mirrors, and shallow shelving all work well.
A: Yes, a regular door can become hidden when the knob is removed and the face is blended into the wall.
A: Use a push-to-open latch, magnetic catch, hidden edge pull, or discreet shelf pull.
A: It can be simple if it is lightweight, shallow, and supported by properly rated hardware.
A: Keep reveal lines clean, match surrounding finishes, fill gaps, sand edges, and align trim carefully.
A: Hire help for structural changes, electrical work, fire-rated doors, stair modifications, or secure-room builds.
What Counts as a Secret Passage?
A secret passage is any hidden route, concealed opening, or disguised access point that connects one space to another without looking like a standard door. It might lead into a closet, reading nook, pantry, office, storage room, under-stair space, basement entry, or private retreat. In some homes, the secret passage is functional. In others, it is mostly decorative and fun. The most beginner-friendly version is not a tunnel or a heavily engineered moving wall. It is usually a disguised door, sliding panel, hinged bookcase, removable wall panel, or curtain-hidden opening. These simple designs can still feel dramatic when the finish, placement, and reveal are handled well. The best secret passages feel intentional, not improvised.
Start with the Space You Already Have
Before buying hardware or cutting wood, study your home carefully. Look for places where a hidden entry would make sense. A closet behind a bookshelf, a storage area under the stairs, a small office off a hallway, or a pantry beside built-in shelving can all become strong candidates. The easiest secret passage projects use an opening that already exists. If there is already a door in place, your job may be to disguise it rather than construct a brand-new passage. That could mean covering the door with vertical wood slats, matching it to surrounding wall paneling, turning it into a mirror panel, or building a shallow bookcase face over it. Existing doorways save time, reduce structural risk, and keep the tool list short.
Keep the Tool List Small
A minimal-tool secret passage project should avoid complex joinery, advanced framing, or heavy demolition. In many cases, you can work with a tape measure, pencil, level, drill, screwdriver, stud finder, utility knife, handsaw or circular saw, sandpaper, clamps, and a paintbrush or roller. If you are using pre-cut materials from a hardware store, you may need even fewer tools.
The more you can plan around standard lumber sizes, ready-made hinges, prebuilt shelves, and lightweight panels, the easier the project becomes. A secret passage is not automatically better because it is complicated. A clean, lightweight, smooth-moving hidden panel will usually impress people more than an overbuilt system that sticks, sags, or looks suspicious.
Choose the Right Secret Passage Style
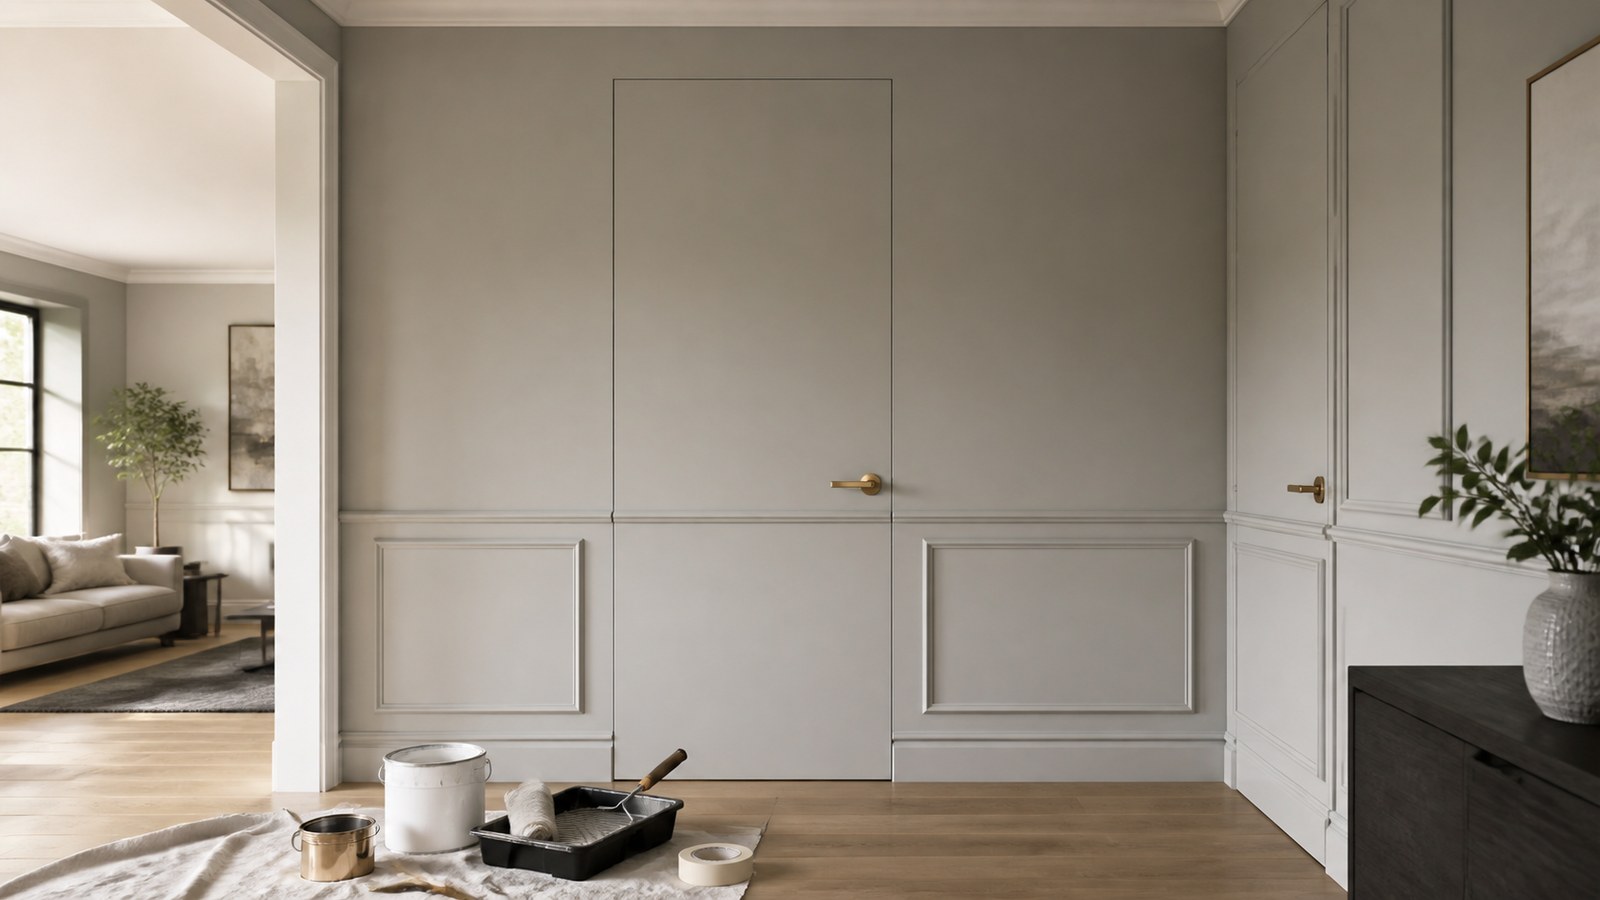
There are several beginner-friendly approaches to creating a hidden passage with minimal tools. A flush panel door is one of the simplest. It uses a flat surface that matches the wall around it, with hinges hidden or visually minimized. When painted the same color as the wall, it can almost disappear.
A bookshelf door is more dramatic but requires more attention to weight and hinge support. A sliding wall panel is another practical option, especially for closets, storage spaces, and under-stair access. A mirror door can work beautifully in bedrooms, hallways, dressing areas, and bathrooms. A curtain or tapestry concealment is the simplest of all, though it feels more decorative than architectural.
The Beginner’s Best Choice: Disguising an Existing Door
For most people, the easiest secret passage begins with an existing door. Instead of removing the whole frame or rebuilding the wall, you focus on changing what the door looks like. If the room already has wall paneling, vertical slats, beadboard, or wallpaper, extend that same treatment across the door. The eye reads the surface as one continuous wall.
This method keeps the project manageable because the original door already swings correctly, latches properly, and fits the opening. Your work becomes cosmetic and lightweight. You can remove the standard knob, install a touch latch or discreet pull, fill visible hardware holes, and cover the face with thin trim, paneling, or matching paint.
Planning the Reveal Lines
Every hidden passage has reveal lines, which are the small gaps around the moving panel or door. These gaps are necessary because the door needs clearance to open. The challenge is making them look intentional or invisible. A reveal hidden inside wall panel seams, vertical trim lines, bookshelf edges, or shadow gaps is much harder to notice.
Before adding any finish material, decide where the lines will be. If your passage is disguised as wall paneling, place the door edges along natural panel joints. If it is disguised as a bookcase, hide the reveal behind the outer frame or side trim. If it is a mirror door, use the mirror frame to conceal the moving edge.
Lightweight Materials Make Everything Easier
Weight is one of the biggest challenges in secret passage construction. Heavy doors need stronger hinges, better framing, and more precise alignment. For a minimal-tool project, lightweight materials are your friend. Thin plywood, hollow-core doors, lightweight MDF panels, foam-core decorative panels, and shallow shelving can help keep the project simple.
If you are building a bookshelf door, avoid loading it with heavy books unless the hardware is rated for that weight. Use lightweight decorative objects, faux book spines, small baskets, or shallow shelves instead. The goal is to create the appearance of a built-in feature without turning the door into a heavy, sagging structure.
Hardware That Keeps the Project Simple
The right hardware can make a simple secret passage feel polished. For a basic disguised door, concealed hinges, pivot hinges, magnetic catches, roller catches, or touch latches may be enough. A push-to-open latch is especially useful because it removes the need for a visible handle. You press the hidden door, the latch releases, and the passage opens. For sliding panels, a simple barn-door-style track can be hidden behind trim, a valance, or a top rail. For bookcase doors, heavy-duty hinges or pivot hardware are safer than standard small hinges. Always check the weight rating before installing hardware. If the hardware is not strong enough, the passage may sag, scrape, or become unsafe.
How to Build a Simple Hidden Wall Panel
A hidden wall panel is one of the most approachable secret passage ideas. Start with an existing doorway, closet entry, or small storage opening. Measure the opening carefully, then create a lightweight panel that overlaps the edges slightly or sits flush inside the frame. Thin plywood attached to a simple wood frame can work well for this.
Once the panel is mounted, disguise it with the same finish used on the surrounding wall. Paint it the same color, continue trim lines across it, or cover it with peel-and-stick wallpaper that matches the room. A magnetic catch or push latch can hold the panel closed. The final result feels like part of the wall rather than a separate door.
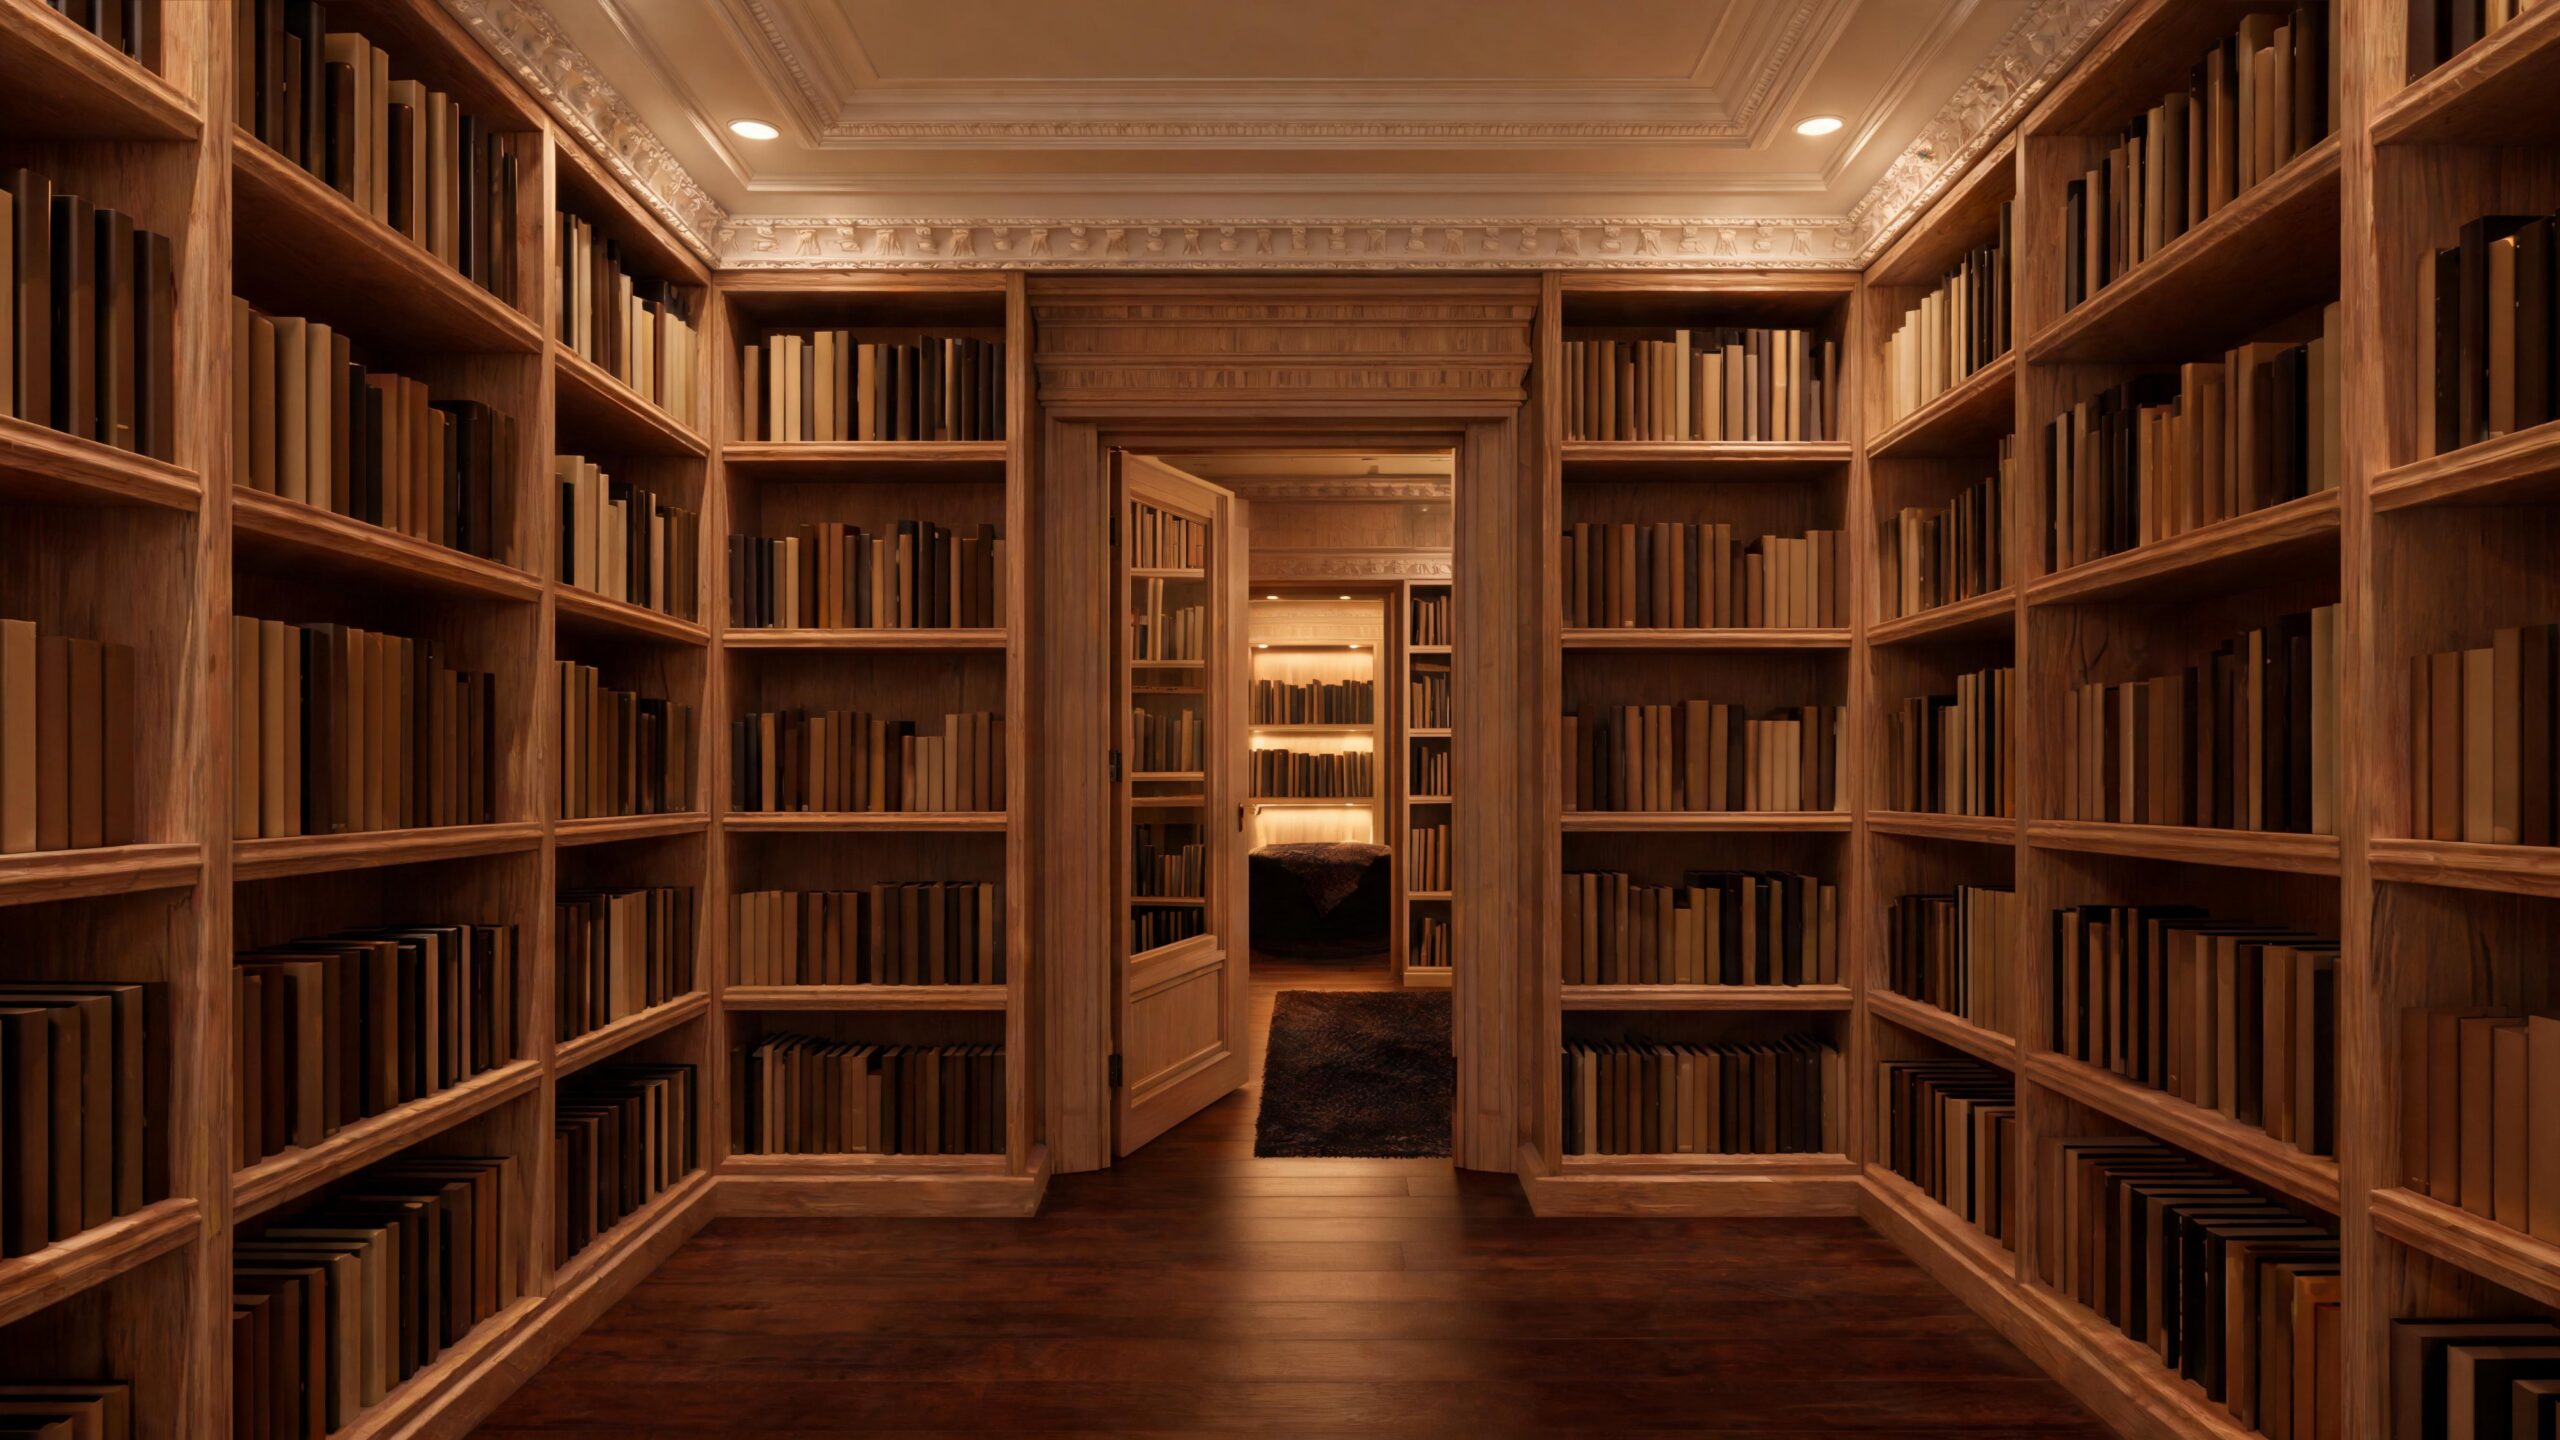
How to Make a Bookshelf Secret Door Without Overcomplicating It
A bookshelf secret door is the classic choice, but it can become difficult if you try to build a full, heavy, floor-to-ceiling bookcase from scratch. A simpler version uses a lightweight prebuilt bookcase or shallow shelving unit attached to an existing door or a reinforced frame. The shelves should be shallow enough to reduce weight and deep enough to look convincing.
To make the illusion stronger, surround the bookcase with trim so it appears built in. Keep reveal lines along the outside frame. Use lightweight decorations instead of heavy objects. A discreet pull hidden under a shelf, behind a decorative item, or along the side edge can open the door without revealing the trick.
The Mirror Passage Method
A mirror secret passage is elegant, useful, and beginner-friendly. A full-length mirror can hide a closet, small room, dressing area, or storage space. The mirror can be attached to a door slab, mounted on a lightweight panel, or used as the face of a concealed hinged opening. Because mirrors already look like decorative wall features, they naturally distract from the presence of a doorway. The frame matters. A slightly thicker frame can hide gaps, hinges, or latch points. For safety, use secure mounting hardware and avoid overly heavy glass unless the door and hinges are designed to support it. Acrylic mirror panels can be a lighter alternative for certain interior projects.
Creating a Hidden Passage Under the Stairs
The space under a staircase is one of the best places for a secret passage or hidden room. Many homes already use this area for storage, but the entry can be disguised with wall paneling, a flush door, a cabinet face, or a bookshelf. Because the space is tucked into an architectural feature, people are less likely to question it.
A minimal-tool approach might involve replacing a standard under-stair door with a panel that matches the surrounding wall. Add trim lines that continue across the opening, use a push latch instead of a knob, and paint everything in one consistent finish. The result can feel custom without requiring major construction.
Finishing Is What Sells the Illusion
A secret passage succeeds or fails in the finishing stage. Even a simple design can look professional if the paint, trim, gaps, and alignment are clean. Sand rough edges, fill nail holes, caulk visible seams, and match the surrounding wall color as closely as possible. Small imperfections can draw attention to the hidden door.
Texture is also powerful. Wood slats, board-and-batten, wallpaper, decorative molding, and acoustic panels can all hide seams better than a plain flat wall. The more visual rhythm a wall has, the easier it is to conceal a moving section within that rhythm.
Avoid Making the Passage Too Obvious
The biggest mistake beginners make is adding too many “secret” details. A dramatic fake book lever, a strange oversized mirror, a suspiciously empty shelf, or a door that sits slightly crooked can make guests notice something is off. A better secret passage looks boring at first glance. Think about how the room normally behaves. Does the hidden feature match the design language of the space? Does the trim make sense? Does the bookcase look naturally placed? Does the mirror belong there? The best disguise is not the most theatrical one. It is the one that fits the room so well no one questions it.
Safety Comes Before Mystery
A secret passage should never create a hazard. It should not block required exits, trap someone inside, interfere with smoke or carbon monoxide detectors, or hide electrical panels that must remain accessible. If the passage leads to a habitable room, closet conversion, basement area, or sleeping space, local building codes may apply.
Always make sure the door can be opened from the inside without special knowledge or a key. Avoid pinch points, sharp edges, unstable shelving, or heavy panels that children could pull on. If you are unsure whether your plan affects structure, electrical systems, fire safety, or egress, consult a qualified professional before building.
Security and Privacy Considerations
A secret passage can add privacy, but concealment is not the same as security. A hidden door may keep casual visitors from noticing a room, but it should not be treated like a safe, vault, or emergency shelter unless it is specifically designed for that purpose. Strong locks, reinforced framing, ventilation, communication, and emergency release systems require more planning.
For most homes, the best use of a secret passage is practical privacy. It can hide a home office, craft room, media room, storage area, or quiet reading space. If security is a major goal, the project should move beyond minimal tools and involve professional-grade planning.
Budget-Friendly Ways to Make It Look Custom
You do not need luxury materials to create a beautiful secret passage. Paint-grade trim, pre-primed panel boards, peel-and-stick wallpaper, lightweight wall panels, cabinet pulls, magnetic latches, and ready-made shelving can create a polished effect on a modest budget. The secret is consistency. Use the same color, spacing, and trim style across the hidden passage and the surrounding surface. If your wall has vertical battens spaced twelve inches apart, continue that spacing over the door. If your hallway uses picture-frame molding, include the hidden door inside the same pattern. Repetition makes the disguise believable.
A Simple Step-by-Step Build Plan
Begin by choosing an existing doorway or access point. Measure the opening, surrounding wall space, and swing clearance. Decide whether the passage will swing, slide, or lift away. For minimal tools, a swinging disguised door or lightweight removable panel is usually easiest.
Next, select your disguise. Choose paint-matched paneling, a mirror, a shallow shelf, wallpaper, or vertical slats. Install or adjust the hinges and latch so the panel opens smoothly. Then apply the finish treatment across both the wall and door. Test the passage repeatedly, adjust the reveal gaps, and make sure it opens easily from both sides.
The Best Rooms for a Minimal-Tool Secret Passage
Some rooms are naturally better suited for secret passages than others. Hallways work well because they often have long wall surfaces that can hide flush doors. Bedrooms are useful because closets and dressing areas can be disguised behind mirrors or paneling. Living rooms are great for bookshelf doors and media-wall concealment. Basements, playrooms, offices, and under-stair spaces are also excellent candidates. Kitchens can work if the hidden space is a pantry, but moisture, cabinetry, and appliance clearances can make the project more complex. Start with a low-risk interior area before attempting anything exterior, structural, or code-sensitive.
Common Mistakes to Avoid
One common mistake is using hardware that is too weak for the door. This causes sagging and makes the passage hard to open. Another mistake is ignoring floor clearance, especially if the door swings over thick carpet, uneven flooring, or a rug. A hidden door that drags across the floor will not feel magical for long.
Another issue is making the hidden element too perfect compared to the surrounding room. If the wall has texture but the secret door is smooth, it will stand out. If the trim spacing changes only around the passage, people will notice. Good concealment depends on matching the ordinary details around it.
When to Call a Professional
A minimal-tool project is best for cosmetic concealment, lightweight doors, and non-structural modifications. You should call a professional if you need to remove studs, widen an opening, alter stairs, move electrical wiring, create a new doorway in a load-bearing wall, add fire-rated assemblies, or build a secure hidden room.
Professional help does not ruin the DIY spirit. It protects your home and makes the final passage safer. You can still handle the creative finishing yourself while leaving structural or code-sensitive work to someone qualified.
Bringing the Secret Passage to Life
A great secret passage is part construction project, part design trick, and part storytelling. It should feel like it belongs in the room, but it should also reward discovery. A quiet click, a smooth swing, a hidden reading nook, or a disguised storage area can make the space feel personal and memorable. With minimal tools, the best approach is to start small, use an existing opening, keep materials lightweight, hide the reveal lines, and let the finish do most of the magic. You do not need a castle, a contractor-grade workshop, or a massive budget. You need a clever plan, a steady eye, and a room with one ordinary surface waiting to become extraordinary.