Lighting Turns a Hidden Passage Into a Usable Space
A secret passage can be thrilling when the door opens, but it should not be dark, unsafe, or awkward to navigate. Good lighting makes the reveal feel intentional and makes the path practical after the surprise wears off. The best schemes do more than add a bulb at the end of a corridor. They guide the footpath, protect the hidden effect, keep wiring out of sight, avoid glare, and give the user control from the right side of the entrance. Whether the passage is a short storage route or a dramatic connection between rooms, lighting is what changes it from novelty to architecture. The passage should feel ready the moment it appears, as if the house always knew where you were going next.
A: Low-profile LED lighting is usually easiest to hide and control.
A: Automatic activation is useful, but a manual backup should still be available.
A: Yes for light use, but battery access and reliability limit serious applications.
A: Place drivers where they are ventilated, labeled, and reachable for replacement.
A: Warm light usually feels more residential and inviting in hidden routes.
A: Use tread, handrail, or low wall lighting that clearly marks each step.
A: They can, but the passage should still function if the network is down.
A: Not if they are diffused in proper channels and installed straight.
A: Use one for line-voltage work, code questions, or complex hidden wiring paths.
A: Bright enough for safe movement, then dimmed or layered for atmosphere.
Start With Safety Along the Path
The first job of secret passage lighting is orientation. People need to see steps, thresholds, turns, low ceilings, hardware, and any change in floor level. A hidden passage is often narrower than a normal hallway, so shadows can make it feel smaller and less secure. Place light where it explains the path, not just where it looks dramatic in a photo. If the passage has a turn, a low beam, or an uneven floor, that detail deserves illumination before any decorative accent is added.
Stairs need special attention. Tread lights, low wall washers, or concealed handrail lighting can show each step without blasting the passage with glare. If the route is used during power outages or emergencies, consider battery backup or low-level emergency lighting that does not depend on a single switch.
Choose Fixtures That Stay Out of the Story
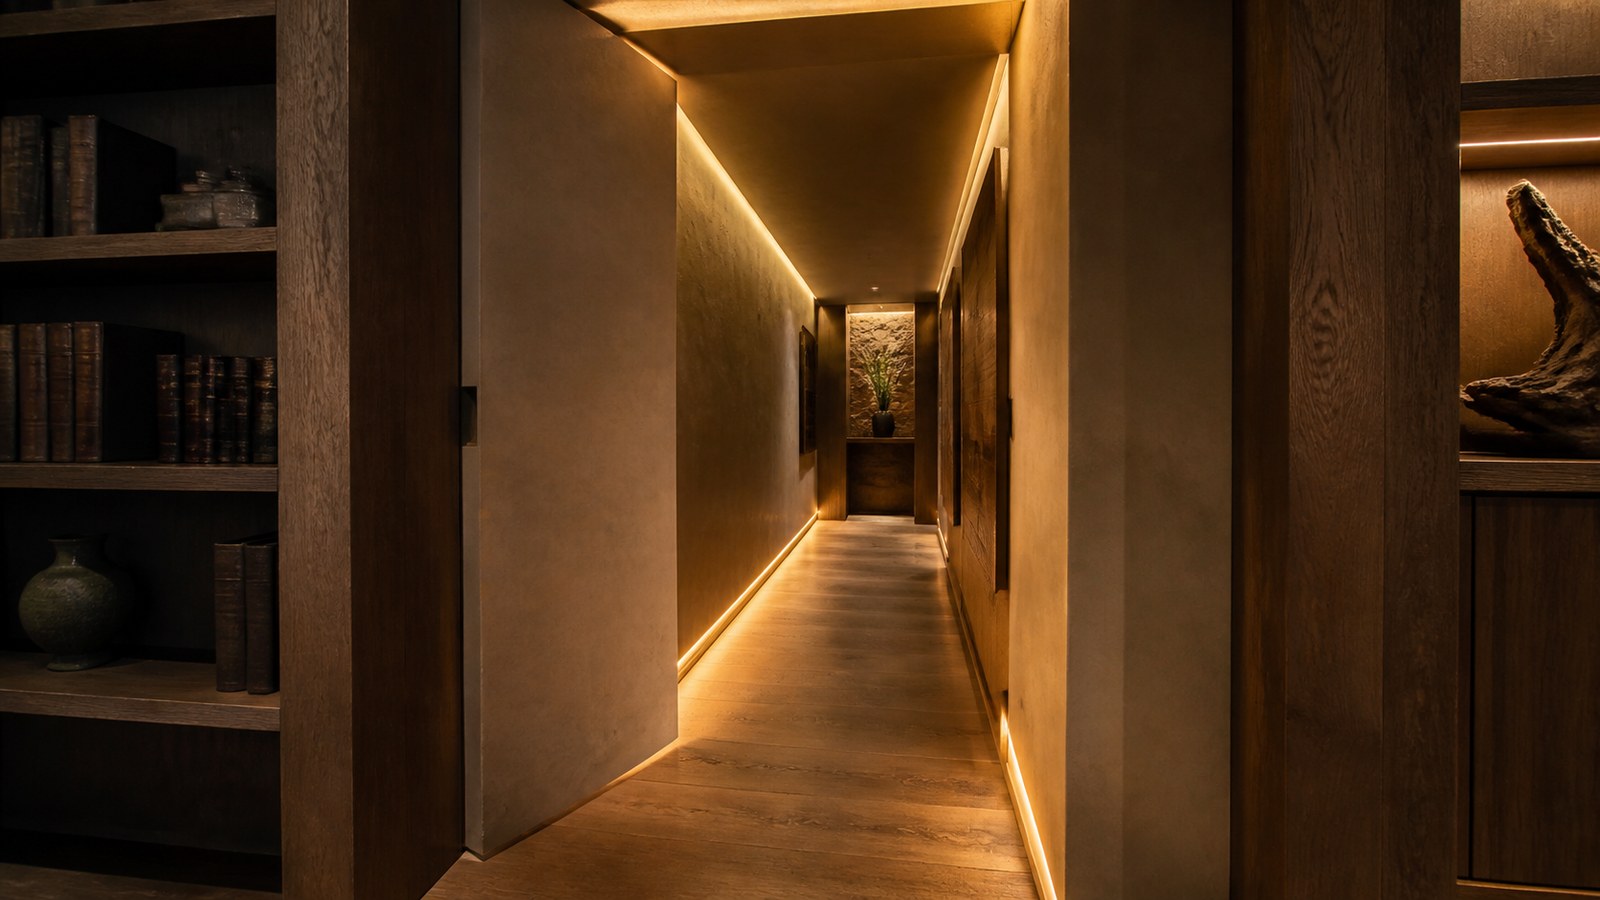
Secret passages usually look best with concealed or low-profile lighting. LED tape tucked into a cove, small recessed downlights, toe-kick lighting, miniature wall washers, and integrated shelf lights can illuminate the route without making the fixtures the main event. The passage should feel discovered, not overdecorated.
Fixture choice depends on surface material. Wood paneling can hide channels and diffusers beautifully. Masonry or plaster may need surface-mounted details disguised as trim. Bookcase passages can use shelf lighting that feels natural from the room side and functional once the door opens. Avoid fixtures that protrude into a narrow path or catch clothing as people pass.
Diffusion matters. Bare LED dots can look cheap and create harsh reflections. A proper channel with a frosted lens turns strip lighting into a smooth line and protects it from dust and damage.
Layer Light Instead of Relying on One Source
A single overhead light can flatten the passage and cast awkward shadows. Layered lighting gives more control. Low-level path lighting can run automatically when the door opens. A warmer accent line can create atmosphere. A brighter task light may be available near shelves, storage, or a landing.
Layering also helps with different uses. A hidden wine corridor may need soft display lighting. A service passage may need brighter practical illumination. A child’s play passage may need cheerful even light. A safe room route may need dependable, immediate visibility. Start with the use, then choose brightness and placement. When one passage serves more than one purpose, put those needs on separate controls so a practical cleaning level can coexist with a softer evening scene.
Plan Controls From Both Sides
The switch location is as important as the fixture. If the light can only be turned on after entering the passage, the first step may be dark. Door-triggered sensors, magnetic reed switches, motion sensors, three-way switching, and smart controls can solve this. The best control feels natural: open the secret door and the path gently lights, close it and the system turns off after a sensible delay.
Manual control still matters. Sensors fail, batteries die, and some users prefer a switch. Place a discreet switch or keypad where it can be reached without revealing the door to casual visitors. If smart lighting is used, make sure the passage still works without an app or internet connection.
Think through what happens when someone enters from the other end. A passage that connects two rooms needs intuitive control in both directions, especially if one side is used by guests or children. The lighting sequence should not require insider knowledge, because safe movement is more important than preserving the drama of a secret switch.
Hide Wiring Without Creating Maintenance Problems
Clean lighting requires early wiring decisions. Low-voltage LED systems need drivers, access points, cable routes, and ventilation for components that produce heat. Hiding everything permanently behind a secret wall can create frustration later. Drivers should be accessible, labeled, and located where they can be replaced without dismantling the whole passage.
Any line-voltage work should follow code and be handled by a qualified electrician where required. Secret spaces are not exempt from electrical safety. Use proper boxes, strain relief, rated fixtures, and suitable wire paths. Avoid pinching wires in moving doors, pivots, or sliding panels.
For retrofit projects, trim channels, baseboard routes, crown details, and shelf cavities can conceal low-voltage wiring elegantly. The trick is to make the concealment look like part of the design rather than a chase added after the fact.
Access planning is part of the appearance. A tiny removable trim section, a concealed cabinet panel, or a service point inside the passage can protect the clean look while still allowing repairs. Future maintenance should not require prying apart finished millwork or guessing where a transformer was hidden.
Use Color Temperature With Intention
Warm light usually suits hidden passages because it feels inviting and reduces the harshness of narrow walls. Around 2700K to 3000K works well for wood, plaster, brick, and residential corridors. Cooler light can feel cleaner in utility passages, but it may make a secret route feel clinical unless the surrounding home already uses that tone.
Color-changing lighting can be fun, but restraint helps. A passage that glows purple or red may be entertaining for a party and tiring for daily use. If RGB lighting is included, set a practical warm default so the space remains useful.
Avoid Glare and Reflections
Hidden passages often contain glossy wood, mirrors, metal hardware, or tight corners. Poorly aimed lights can shine directly into the eyes or reflect off the secret door as it opens. Test fixtures at actual standing height. Look from both directions and from the entrance as the door swings or slides.
Grazing light can be beautiful on stone or textured plaster, but it also reveals every bump, seam, and patch. If the passage surfaces are imperfect, softer indirect lighting may be more forgiving. Let the light flatter the construction you have, not expose every compromise.
Mockups are valuable here. Temporarily tape an LED strip, clamp a small work light, or test a battery puck before committing to holes and channels. Seeing the light in the real passage will tell you more than a fixture photo, especially when the space has unusual angles or dark finishes.
Make the Reveal Feel Calm
Theatrical lighting has its place, but a secret passage should not startle people every time it opens. A gentle fade-in, a warm path line, or a soft glow beyond the hidden door can create anticipation without feeling like a haunted attraction. The mood should match the home. A contemporary house may use clean recessed lines; a traditional library may use warm shelf lighting and low sconces.
When the lighting is right, the passage feels safe before it feels dramatic. You can see where to step, find the handle, move without glare, and close the door behind you without fumbling. That calm usability is what makes the secret last. The surprise opens the door; the lighting makes people want to keep walking.
Commission the System Like a Small Room
After installation, test the passage at night, during the day, with the door half open, and with the door fully closed. Check sensor timing, dimmer levels, heat around drivers, and whether any fixture buzzes in the quiet space. A secret passage is memorable because the reveal feels effortless, and effortless lighting comes from careful testing after the exciting parts are already installed. Walk the route slowly, then quickly, then while carrying something, and notice whether the light still tells your body where to go. That final commissioning step turns a clever installation into a route people can actually trust.
Match the Light to the Hidden Door
The passage lighting should begin with the entrance itself. A pivot bookcase may look best when shelf lighting continues into the corridor. A flush wall panel may call for a slim reveal of light that appears only after the door opens. A rustic cellar passage may feel better with warm low sconces than with crisp modern strips. Matching the lighting language to the door makes the reveal feel designed rather than assembled from unrelated parts.
Pay attention to what people see from the main room before they enter. If the first visible fixture is too bright, the secret can feel theatrical in the wrong way. If the passage beyond is too dark, the reveal feels unsafe. A soft glow just past the threshold often gives the best invitation: enough mystery to make the entrance special, and enough visibility to make the next step obvious.
Document the System for Future Repairs
Hidden lighting can be difficult to troubleshoot if nobody knows where the drivers, sensors, low-voltage runs, and access panels live. Take photos before trim goes on, label components discreetly, and keep fixture specifications with the house records. The system will feel more magical to guests, but it should never be mysterious to the person responsible for maintaining it. Include the color temperature, driver capacity, dimmer model, sensor type, and any special programming notes. If a strip fails five years from now, those details can turn a frustrating investigation into a straightforward repair. A secret passage can keep its sense of wonder while still being documented like the practical electrical system it is.
Let the Passage Age Gracefully
Lighting technology changes, but the passage should not depend on a fragile novelty. Choose replaceable components, accessible drivers, and fixture locations that will still make sense if the controls are upgraded later. A warm hidden corridor can feel timeless when the infrastructure is practical.
That future-minded approach also protects the secret. If a failed strip requires tearing apart the trim, the repair may leave scars that reveal the route. If the system was planned for service, the passage can stay polished, safe, and quietly dramatic through years of use. The best lighting plan is not only beautiful on the first night; it is still understandable when a component eventually needs attention. Serviceable design keeps the magic from becoming a maintenance problem, and it lets the passage remain dependable long after the novelty has become part of daily life. That dependability is what makes the hidden route feel permanent, not just impressive during the first walkthrough, photo, or tour with guests nearby after dinner on opening night in the finished home, years later too, comfortably.


